5 DIY Home Heater Ideas with Step-by-Step Guide
Staying warm is one of the major concerns during the cold winter season. Every year, we have to spend a lot of money on heating systems and the cost of staying warm with these devices can really be a financial burden for many of us. Well, not every time. If you are clever and innovative enough, you can actually heat your house with a little fuel cost. Don’t be gloomy. If you have doubts about your creativity, we are here to help you. The Soothing Air team has come up with many creative DIY heater ideas for you.
1. Flower Pot Heater/Terracotta Pot Heater
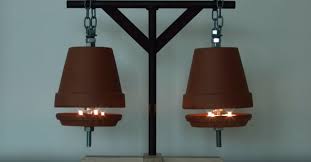
This is one of the most popular forms of homemade heaters and they are perfect for an emergency time like when there is a power shortage. There are many designs of flower pot heater available on the internet. Most of them work fine but are designed for short-term use. Moreover, they don’t look so good to be used in front of the guests. Our terracotta pot heater or flower pot heater is so well designed that you can use it as a home decorator. You can also use it in non-emergency situations and it is portable in size. One flower pot heater with four candles is sufficient to provide comfortable heating to a small sized room, such as a bathroom.
Things You’ll Need
- 4 candle lights or Tealights
- one 5-inch size flower pot
- one 6-inch size flower pot with its base
- 14 pieces of ½ inch nuts
- 11 pieces of ½ inch flat washers
- ½ inch threaded rod with a length of 11 to 14 inches.
- A metal chain
How to Make?
- At first, put two nuts at one end of the rod. This is to make sure that nothing falls out after you assemble your terracotta candle heater.
- Create a loop of the metal chain by placing two endpoints of the metal chain into the rod. Then close the chain with another nut to fix it tightly on the rod.
- Put a washer on the rod on the opposite side of the metal chain and insert the rod into the hole of the 6-inch flower pot. Close it with one washer and nuts.
- Then put one washer followed by the 5-inch pot and close it with two more nuts. The nuts will make the pots fixed to their positions.
- Now put all the nuts and washer leaving one of each behind into the rods. These metal nuts and washers will help retain and radiate more heat.
- Finally, make a hole in the center of the flower pot base and stick it with the rod with one washer and nut.
Your terracotta pot heater is ready to use. Now you can hang your stylish homemade candle heater on any stable stand or shelf.
How to Operate?
Using our version of flower pot heater is very easy. You just have to put 4 candle lights or tea lights on the base. One thing to take note of though – you must keep a small gap between the base and large pot to keep an open way for oxygen. However, if the gap is too big then the heat generated by the candles would be lost. One flower pot heater can make a small size room warm within 30 minutes. It would take around 15 to 20 minutes to start radiating heat. You can use two or three flower pot heaters if you intend to use these heaters in a bigger room. The main benefit is that these heaters don’t require any maintenance. This is the cheapest way to heat a house without needing any type of heater or even electricity.
2. DIY Heater – Ceramic
Our DIY heater ceramic is the most effective homemade heating solution for a medium size room. It utilizes the thermal capability of ceramic with the basic design of a fan heater. This heater is also powered by candles. With only three candles, its highest recorded heat was 300°F. With the fan running, it can constantly generate temperatures around 200°F.
What You’ll Need?
- 4 or 5 bricks
- Ceramic bowl or Stoneware (we used Stoneware from 4.5-quart crock pot)
- Tray or plate to put the candles
- A small size fan
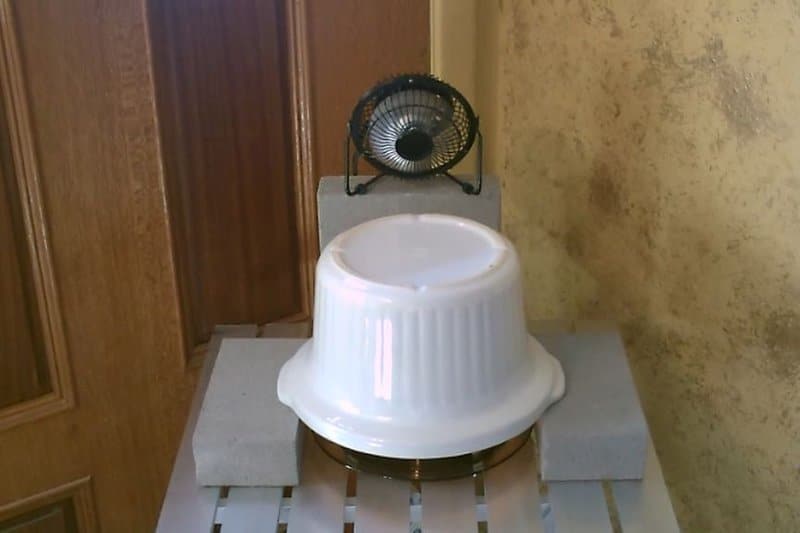
DIY heater: DIY Ceramic Heater
How to Make?
- Pick a suitable spot to assemble our DIY homemade ceramic heater. A corner of the room would be great. That way the heater can transfer heat to the center of the room. Make sure to place it on a least used side of your room. This will reduce the chance of any accidents. Place the heater on any inflammable object like a metal table.
- Put the candles on the tray and place two bricks beside the tray.
- Light on the candles and put the stoneware on the top of the tray by placing its edge on the bricks.
- Place two or three bricks behind the ceramic bowl and place the fan on top of those bricks.
How to Operate?
To operate this ceramic heater you just need to light up the candles and turn on the fan. You are all set to enjoy the comfortable heat all over the room. Because of the excellent heat absorbing and radiating ability of ceramic stonewares this heater works superbly. Unlike other space heaters, the ceramic bowl doesn’t take too long to heat up. The fan enhances the heat radiation capability of the heater in the intended direction. The DIY homemade ceramic heater might not be as stylish as clay pot heater but it is very effective in comparison to other DIY heaters. And the amazing thing is that this heater doesn’t require any fuel other than some candles and a few volts for the fan. You can also use this as a homemade garage heater.
3. Alcohol Heater
Alcohol heater is a type of heater you can make with normal household supplies during any emergency time. Learning to make an alcohol heater will enhance your survival skill to many folds. If you are without power alcohol heater can provide you emergency heat to cook and stay warm. This is a very cheap ( around $6) and reusable heater. You just have to refill 70% rubbing alcohol. However, this heater functions with an open flame and it must be dealt with great care.
Things You’ll Need
- Metal can. (soup cans, paint cans will do)
- Toilet paper rolls
- 70% isopropyl alcohol or rubbing alcohol.
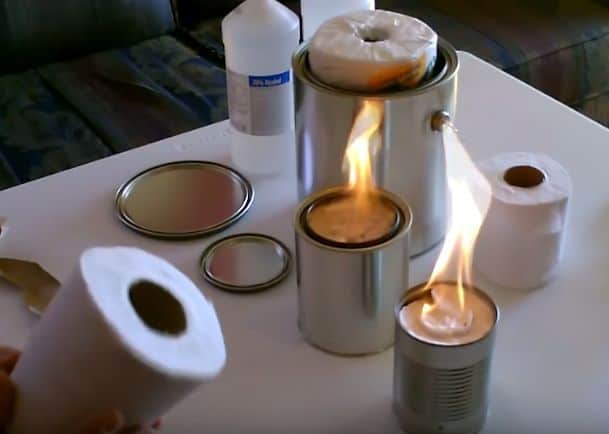
DIY heater: Alcohol / Toilet Paper Heater
How to Make
- Put a roll of toilet paper into the metal can.
- Pour rubbing alcohol over the toilet paper so it is just drenched.
- Light fire on the alcohol
How to Operate
Alcohol heater is perfectly safe as long as you deal carefully with the fire. The alcohol works as the fuel and the toilet paper works as a wick in a candle. It can burn for over an hour since only the alcohol which is exposed to the air gets burned. The alcohol in the bottom of the can stays cool.
4. Homemade Electric heater
If you are looking for a homemade heater that works with electricity then we suggest this DIY DC Fan Heater. It is very cheap and easy to make. It is safe to use since it is not exposed to open flames like previously mentioned heaters. All of the materials used in this induction heater are available in general shops. This heater can produce around 30°C temperature and you can use it to heat a small size room perfectly. You can also use them as homemade garage heater if your garage size is small to medium.
Things You’ll Need
- 30 ML Syringe
- 24 inch Nichrome Wire
- Plaster of Paris
- A metal can
- Electric tape and Electric wire
- A metal grill equal to the size of the metal can
- A tin-opener
- An electric fan that fits into the metal can
- A thin rod of steel.
- An electric switch
How to Make?
- At first, take the nichrome wire and roll it over the 30ml syringe to make a coil.
- After making the coil, remove the syringe from the coil.
- Take some plaster of Paris in a cup and pour some water into it. Then mix it well with a spoon or stick.
- Fill the 30ml syringe with the plaster of Paris mixture while it is in a liquid form.
- Remove the pumper from the syringe and keep it stable vertically that way for some time.
- Now open closed side of the metal can with the tin-opener.
- When the plaster of Paris gets to a solid form cut the syringe barrel with a hot welding machine and get the solid plaster out from the barrel.
- Then put the plaster into the coil and stick a thin steel rod into the solid plaster from one side to another.
- Now wire both ends of the coil with an electric wire and cover it up with electric tapes.
- Then make two holes into the body of the metal can and fix the wired coil into the can by the loose ends of the steel rod.
- Make a few more holes to the can’s body for the switch and heater stand.
- Put the switch in a hole and wire it with the electrical cords connected to the coil
- Cut an appropriate hole in the center of the can’s lid and fix the electric fan to it with screws.
- Stick the metal grill to the side which is closest to the coil heater and seal it with screws to make it safe for use.
- Connect the fan’s power line with the switch.
- Close can with the fan attached lid after getting the power cord out with a hole.
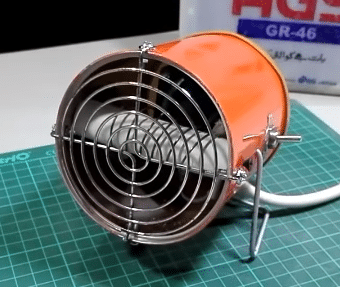
DIY heater: Electric Fan Heater
How to Operate
Once you have followed the instructions above your heater is ready to be used. Plug in the power cord and switch it on. It will take 5-10 minutes to get the coil warm and the fan will suck the cool air and push it through the warm coil to transfer the heat around.
5. DIY Solar Heater
If you are looking for a heating solution which works on unlimited natural energy then this DIY solar panel would be the best choice for you. This solar heater is made of lots of aluminum cans. You might think that it is weird. But the idea is not very far fetched. The great thing about this technology that not only it is green but also recycling, thus making it very cost effective and efficient. This is the cheapest way to heat a house that provides a long-term heating solution.
Things You’ll Need
- 240 aluminum cans
- 4 feet * 8 feet * ½ inch sheet of plywood.
- 4 feet * 8 feet Plexiglas
- High-temperature silicon
- Heat resistant black spray paint
- Plastic tube
- Drill machine with wide drill bits
- Wood to make a 4 feet * 8 feet *3.5 inch frame.
- An air blower that works on solar power
How to Make?
- Build a 4 feet* 8 feet * 3.5-inch wooden frame with the wood sheet. Then nail the same size plywood sheet to the back of the frame.
- Drill two holes, one in the top of the frame and another one at the bottom of the frame.
- Drill large holes in both sides of the cans except 16 cans. These 16 cans should be drilled only on the top. They will be in the bottom rows. You must take caution since aluminum can be very sharp.
- Place these cans on top of each other. And seal the joint area with silicons. Make 16 columns of cans each containing 15 cans.
- Allow the silicon to cure and then spray the black paint on them and on the frame.
- Stick the columns into the frame and cover them up with Plexiglas.
- Cut two holes into the room or house in which the heat will be provided. One hole should be at the bottom of the wall just above the floor level. One hole should be in the top of the wall.
- Mount the frame you just made on the exterior wall or any area where is a lot of sun exposure.
- Connect both holes of the frame with the holes of the room through the plastic tube. And insulate them as much as you can.
- Install the blower at either top pipe or low pipe. It would make the air flow more efficient.
How Does It Work?
This solar panel sucks the cool air from the bottom tube of the room then draws them to the heat resistant panel. Being exposed to sunrays, the painted aluminum cans heat up swiftly. Also, the cool air sucked from the room gets tunneled into the panel and heats up. The hot air then returns through the upper tunnel. One thing is worth noting that a solar panel heater is not gonna provide temperature as same as a gas furnace or oil heater, but it can provide heat to a reasonable temperature without any external energy. You can check out this video to learn more about this DIY solar panel heater.
DIY heaters are a great way to save big on your heating costs. They are super cheap and some of them are even environmentally friendly. So get your toolkit and start making a DIY heater today!
Categorised in: Heaters


1 Comment
Warning: Undefined array key 180 in /www/wwwroot/thesoothingair.com/wp-content/themes/ultimateazon/functions.php on line 402
Thanks for this information but my question is How do I choose the right type of heater?