
2 Most Common and Annoying Humidifier Problems & How to Fix Them

“Dad, there’s a puddle of water under the humidifier!”
“Honey, I don’t think the humidifier is working. There’s water in it, but no mist is coming out.”
Two sentences that can strike fear in an instant. All too often, the remedy for a humidifier that isn’t misting is to just run out to the nearest store and pick up a new one by following the right steps. But that’s an expenditure you probably don’t have to make. Knowing how to fix a humidifier that is not working isn’t rocket science. If you can handle a screwdriver, you can do this! So, before you grab your keys and credit card, try these quick and easy steps to see if you can resolve the problem for free.
Is Your Humidifier Not Steaming or Blowing Mist?
 The most likely cause of a humidifier not steaming is improper or insufficient cleaning. There are two main types of humidifiers. Warm mist humidifiers generate steam by passing the water over a heating element, causing it to turn to steam. Cool mist humidifiers work in two different ways. Some that use a fan to blow air over a wick saturated with water are called evaporative humidifiers. Ultrasonic humidifiers use a high-frequency vibration technology to turn water into microscopic droplets that are then released into the air. Both warm and cool misting humidifiers have their pros and cons. The point for now is, you need to know which type of humidifier you have before you can fix the problem.
In any case, the first two steps in how to fix a humidifier that isn’t working are always the same. First, unplug the unit from the wall socket. Water and electricity are a notoriously bad combination, and trying to do anything inside the shell of your humidifier before unplugging it is just begging for a trip to the emergency room, or worse. The second step is to drain the humidifier’s water reservoir. Cleaning up a puddle of water is an unnecessary complication.
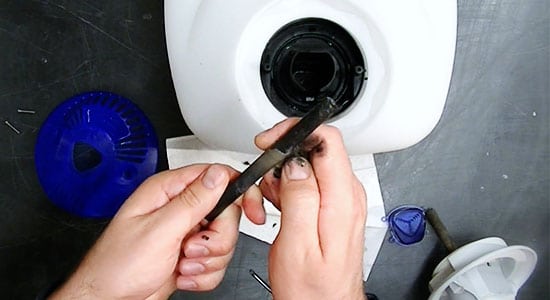
If the problem involves a warm mist humidifier not steaming, the cause is most likely a build-up of mineral deposits on the heating elements. These elements are responsible for turning the water to steam. But tap water contains varying levels of minerals and other impurities. As the water comes in contact with the heating elements, it evaporates but the minerals don’t. Over time, they build a crusty, black or dark brown coating on the elements and effectively create an insulating layer over them. At this point, not enough of the heat generated by the elements can pass through the crust to turn the water to steam. The remedy to getting the machine working again is to carefully chip off this mineral crust, once again exposing the metal heating element.
The humidifier probably came with a special wrench or screwdriver that you, no doubt, threw in that “junk drawer” near the kitchen door. Now is the time to rummage through the drawer, and congratulate yourself for being forward-thinking when you decided to file the little tool away so, um, carefully. What? Can’t you find it? Then you may have to make a trip to the local hardware or electronics store to find a replacement.
On most humidifiers, there are two little screws at either side of the port where the steam comes out. Use the special tool to unscrew them and carefully lift the cap off. Once removed, you will commonly see the two heating elements. They can be removed, but it’s less complicated to leave them in place while you clean them. If you do feel it is necessary to remove the elements, consult your owner’s manual to make sure you understand the procedure for putting them back in.
Now carefully chip away the mineral deposits from the heating elements. They are not likely to be very heavy or difficult to remove, so be gentle or you could damage the heating elements. Avoid using a sharp instrument like a knife for this task. Damaging the elements would likely result in that trip to the store that you’ve been trying to avoid.
Once you have cleaned the elements, replace the cap, fill the humidifier with clean water, plug it in, and reward yourself for being so handy as you watch the misting resume.
If you have a cool mist humidifier not steaming, the cause is likely the same mineral culprit. However, the deposits may be clogging a filter instead of a heating element. Although many cool mist humidifiers don’t have a filter, for the ones that do, getting it working again is usually a simple matter of removing the old filter and replacing it with a new one. Go through your owner’s manual for the proper procedure for filter replacement.
Is Your Humidifier Leaking Water?
 For a small and portable humidifier, this is usually just a matter of not having properly seated the reservoir tank in its place. But for whole house units integrated into the home’s forced-air heating system, there may be any of several reasons for water leakage. It may require a call to your HVAC technician, but a little troubleshooting before you reach for the phone could save a bundle of money.
There are several root causes for a humidifier leaking water. Four things to check are the incoming water pressure, the drainage tube from the unit, the solenoid valve or float, and the evaporator pad. Don’t get too flustered by the terminology. Even if you don’t know what a solenoid is, you may still be able to fix it. Let’s look at these problems individually.
Whole house humidifiers get their water from the same supply as everything else in the house. There will be a small line running from one of the water supply pipes in your home directly to the humidifier. If the water pressure in this line is too high, it will be able to force its way past the cutoff valve inside the unit. The free flow of water will overfill your humidifier and run out of the first available opening. The pressure in that water line should be below 125 psi. If it’s higher, the likely remedy is to place a pressure reducing device in the line. Unless you’re handy with plumbing, this one requires a call to the technician.
If the problem is a backup of water in the drain line, however, you can probably tackle it. In addition to the water line that delivers water to the unit, whole house humidifiers also have a drain hose, just in case there is some sort of overflow. Remember that water always flows downhill. If this drain hose doesn’t have a steady downhill flow, it could back up. Be sure there are no kinks or upward slopes as the hose makes its way to the drain. The drain hose could also have an obstruction inside. Remove the line from the humidifier and flush it with fresh water before replacing it on the unit.
Check out Our Top 10 Whole House Humidifiers!
Remember the clogged filter scenario for small portable humidifiers? The same thing can happen on whole house humidifiers. Most of them operate by blowing air through a spongy membrane called an evaporator pad. Some have a replaceable filtering device called a scale control insert. Over time, they can become clogged with minerals and other debris. Some are reusable and simply require cleaning, while others are designed to be replaced. Consult your owner’s manual for the proper procedure for your humidifier.
Even though it may sound daunting, if the problem is with the solenoid valve, you still may be able to tackle the problem. The solenoid is simply an electronic valve that controls the flow of water from the source line into your humidifier. It uses a float or some other method of measuring the amount of water in your humidifier’s reservoir, and opens the valve to let some more water in when it is needed. Then, it closes the valve when the water has reached the appropriate level. But if dirt, say a grain of sand or fleck of corrosion from inside some old supply pipe, gets caught in the valve, it won’t be able to close properly.
To check if the solenoid is working properly, first make sure the water is shut off to the humidifier’s supply line, and disconnect the unit from its electrical supply. Now, take a look at the solenoid (it’s usually brass and is the first thing the water supply line is connected to) to make sure it has been properly installed. There should be an arrow printed or stamped on the solenoid to indicate the direction water should flow. If the arrow is pointing toward the humidifier, it was correctly installed. But if the arrow points in the direction the water is coming from, call your installer and tell him or her that you are owed a free service call to fix it.
Remove the solenoid from your humidifier. It’s probably held in place by a couple of small screws or bolts. Make sure you understand how it’s mounted before you remove it. Taking a cellphone reference picture of it in its proper place is always a good idea. In a sink or with a garden hose outside, gently flush the valve with water to clear any debris. One other way to do it is with air pressure. Either blow through it or use canned air from an office supply store to whisk away any offending particles.
If yours has a float valve instead of a solenoid, the cause of your humidifier leaking water may still be dirt or mineral build-up. The process is essentially the same as a solenoid. Gently clean the area around the valve seat to make sure nothing is keeping it from sealing tightly.
Maintenance:
Most of these emergency situations with humidifiers can be avoided with preventative maintenance. You should already have your whole house HVAC system serviced by a trained technician at least once a year, and many recommend doing it twice a year – once before the beginning of the cooling season, and again at the start of the heating season.
For smaller units, regular cleaning is the best way to avoid problems. One of the best tips for keeping your room-sized humidifier happily misting away is to use distilled water. It contains no minerals and will not result in the deposits that can choke off that steady stream of mist.
If you forget to take the preventative steps outlined above, at least now you know how to fix a humidifier. The skillset required is not complicated, but not everyone is prepared for it. Just remember, always disconnect water supply lines or remove water reservoirs, and unplug the electrical power before attempting any repair work on your humidifier. And if the project looks like more than you are willing to undertake, seek outside help.
Humidifiers are important household appliances in many climates. The dry air in cold winter climates is not friendly to skin and respiratory systems. Also, a properly humidified house “feels” warmer, which can help save on energy bills. With just a little care, your humidifier will make you healthier and your home, much more comfortable for many years to come.
Check All The Discounted Humidifiers!
Categorised in: Humidifier, Techniques and skills